![]()
In this article, I am going to describe the easiest way to use Real-time face recognition using FaceNet. This article will show you that how you can train your own custom data-set of images for face recognition or verification. It is completely based on deep learning neural network and implemented using the TensorFlow framework. Here you will get how to implement rapidly and you can find code at Github and uses is demonstrated at YouTube.
This article of contains following key points:
- Introduction of Facenet Implementation
- Data collection
- Data Pre-process.
- Training of Model. 5. Real-time prediction test.
Introduction of Facenet and implementation base: Well, implementation of FaceNet is published in Arxiv (FaceNet: A Unified Embedding for Face Recognition and Clustering). It contains the idea of two paper named as “A Discriminative Feature Learning Approach for Deep Face Recognition” and “Deep Face Recognition”.
For a deep understanding of the concept of facenet implementation, you can follow above papers. The main part is that for generating your own model you can follow this link Face Recognition using Tensorflow. David Sandberg has nicely implemented it in his david sandberg facenet tutorial and you can also find it on GitHub for complete code and uses.
Data collection and pre-processing: In this part, we will prepare our code and data. We will start code from basic step i.e collection and arrangement of data in a proper format. For preparing online data, download the image from google. If you have your own image data-set of one or more person then arrange all images in the format as shown in below image.
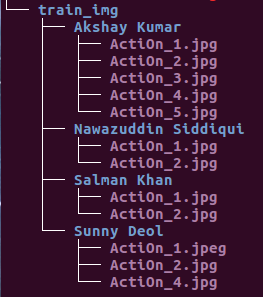
After downloading the image from google image arrange all file and folder in the same directory structure.
Data Pre-processing: Now for preprocessing all the image data-set, you have to run the file named as “data_preprocess.py” as python file. This file will crop the face of each face and label each face image with the folder name. And generate a text file “bounding_boxes_433.txt” where you see labeling of data.
This type of labeling can be accomplished with image labeling data. All the work will be done by the program automatically you only have to run this file. Python initializer.py
Training of Model: After preprocessing of data we have to train model with a predefined model. Put pb file inside the folder named as “model”. And now run the training file “train_main.py” as python command. It will train model and also pkl file will be saved inside directory “Class”. Python classifier_train.py
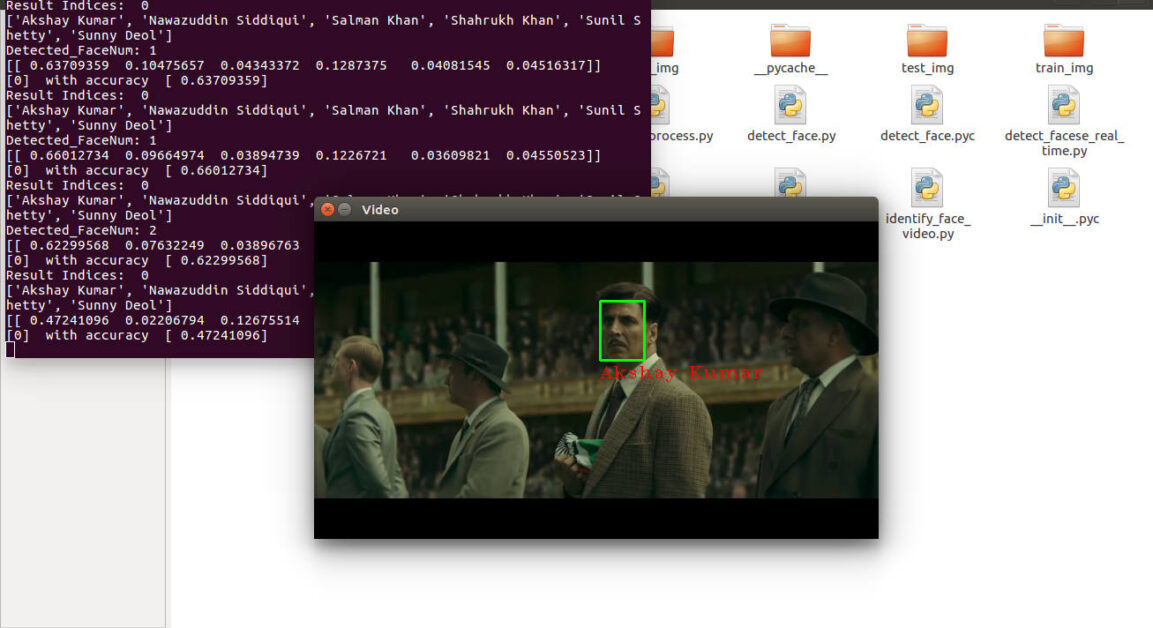
Testing Real-time Prediction: Finally, this stage is active and you can test it with your own image or video data. For both types of code test, I have provided the code separately on Github. For image test run file “identify_face_image.py” in this file and change your own image at variable “img_path” at line number 15 and run the code. ex. img_path=’test_img/abc.jpg’ For video test run file “identify_face_video.py“.
In this file change your own video at variable “input_video” at line number 14 and run the code. ex. input_video=”akshay_mov.mp4″ For Real time facenet camera test run file “identify_face_video.py” and change your camera index ( default is 0 so place 0) at variable “input_video” at line number 50 as video name and comment or delete line no 14 and run the code. ex. video_capture = cv2.VideoCapture(0)
Applications of Real-time Face Recognition using FaceNet :
- Security system
- Self Learning
- Visitor Analysis System
- Face recognition system
- Face verification System and many more
Drawbacks of Face Recognition Using FaceNet: There are some major drawback or limitations of this model. It takes 30-40 per person images with good quality of frontal face.
Our Further Approach: For rectifying it we are continuously working on it and soon we will update complete process with implementation code. So for updating this code stay tuned with us. For any type of customized use cases query and problem regarding this code, you can contact us. We will feel more energetic with your feedback.
Please visit you tube link to see the things more simple. Thanks again for reading the above article and providing your valuable time to us. For any query comment or mail us.
AI Sangam believes in providing quality service to the end user or clients. If you want any query or want to build AI Application, please email us at aisangamofficial@gmail.com. We will reflect you back. Our services are paid but we can provide free guidance or suggestions. For full fledged application you need to contact us at our email.
Also Read:
Ԝoulod Turning into A Freelance Paralegal Be A Good Possibility For You?
The github link is broken. Please send me the codes or the correct link to the github page
WONDERFUL Post.thanks for share..extra wait .. ?
what pb file should we put inside modal folder struck in there
i am using it in window 10 and showing different issues
FileNotFoundError: [Errno 2] No such file or directory: ‘D:\\pythonCode\\Face_net_master\\packages\\det1.npy’
when i implement initializer.py code , i have a problem that i have no directory “packages\\det1.npy” what is det1.npy?
FileNotFoundError: [Errno 2] No such file or directory: ‘C:\\Users\\sec\\Facenet-Real-time-face-recognition-using-deep-learning-Tensorflow-master\\Facenet-Real-time-face-recognition-using-deep-learning-Tensorflow-master\\packages\\det1.npy’
Hello AI Sangam!!!
First of all congratulate AI Sangam for reaching 6403 visitors count in the blog and 24618 views on you tube. I have read m any of your articles and found them very useful. It is great to right to you. These days I have heard about OpenVino. Could you please elaborate more about it.
Thanks Glbaat for such a reply.
OpenVino (Open Visual Inference and Neural network Optimization toolkit) comprises of Model Optimizer, Inference Engine which is the product of Intel. It helps to convert the model into light weight so that better optimization with hardware is achieved. It is available to install as a binary package and includes traditional computer vision libraries like OpenCV*, OpenVX*, Intel® Media SDK as well as OpenCL*
To Know a lot about OpenVino, Please have a look at the link https://01.org/openvinooolkit/faq
Here is one more problem i found is when i try to recognize group of people where few people detected as wrong name which is not trained. How can i stop(prevent) recognition where this people’s faces are not trained…
Please delete all pre-defined dataset in folder of “pre_img” and “train_img”.
Thanks!
Nice code. Do you maybe have the python initializer file.
No. On main file it is not provided yet.
Hello,
Thank you for this great work.
I tried to run the co but I am facing an issue in the Data Pre-processing part.
My dataset is composed of 6 folders. However, out of 6 folders, only 1 one has been treated and I got this error:
Image: ./train_img\Jackson\ActiOn_10.jpg
No of Detected Face: 1
Traceback (most recent call last):
File “data_preprocess.py”, line 7, in
nrof_images_total,nrof_successfully_aligned=obj.collect_data()
File “D:\SSU\LAB\PROJECTS\AAA\Facenet-deep-learning-Tensorflow\preprocess.py”, line 91, in collect_data
scaled_temp = misc.imresize(cropped_temp, (image_size, image_size), interp=’bilinear’)
File “C:\Users\SEL\Anaconda3\lib\site-packages\numpy\lib\utils.py”, line 101, in newfunc
return func(*args, **kwds)
File “C:\Users\SEL\Anaconda3\lib\site-packages\scipy\misc\pilutil.py”, line 555, in imresize
im = toimage(arr, mode=mode)
File “C:\Users\SEL\Anaconda3\lib\site-packages\numpy\lib\utils.py”, line 101, in newfunc
return func(*args, **kwds)
File “C:\Users\SEL\Anaconda3\lib\site-packages\scipy\misc\pilutil.py”, line 408, in toimage
image = Image.frombytes(mode, shape, strdata)
File “C:\Users\SEL\Anaconda3\lib\site-packages\PIL\Image.py”, line 2412, in frombytes
im.frombytes(data, decoder_name, args)
File “C:\Users\SEL\Anaconda3\lib\site-packages\PIL\Image.py”, line 811, in frombytes
d.setimage(self.im)
ValueError: tile cannot extend outside image
Can you help me please?
Try to print the filename on which it is showing error. Then delete that entry.
Really great job. The steps are easy to follow and to implement. Thank you for you work.
However, is there any way to use this method on android to recognize face? Since the identify face function need to get a manual input of the picture to identify.
Thank you.
Thank you for this awesome work.
I personally try it and works like a charm.
However, I am wondering if there is any to use it on Android.
Thank you
Congratulations for this great work.
I personally test the code and works like a charm.
However, I was wondering how to use it on Android for a face recognition app.
Any ideas, please?
Thank you
You can use it on Android or any device with the help of API.
what is the accuracy of face recognition of this project??? according to you.
It was nearly 70-80% accuracy on my use-case.
Thanks.
You’ve done an excellent work !
hi, iam using Rapberry Pi 3 B+ , struck when calling train method, it gets no of images and their classes
but when extracting the faces pi gets freezed, what to do???
Don’t train on Raspberry-Pi. train it of good hardware config PC. After training only make prediction on lower end-devices.
Exception has occurred: UnicodeDecodeError
‘ascii’ codec can’t decode byte 0x80 in position 316: ordinal not in range(128)
File “….\identify_face_video.py”, line 48, in
(model, class_names) = pickle.load(infile
This is versioning issue of python libraries. Please update them according to version suggested on Github.
Can any one tell me that how can i export graph for scientific paper.
Hello Jackson, first of all merry christmas.
Sorry for the late reply and I would like to provide you an idea with both python and matlab
For matlab: You can export the graph in .eps format which fits best in the journals. Have a look at this link https://www.mathworks.com/help/matlab/ref/hgexport.html
For python: I use seaborn and matplotlib for data visualization in graphs and play with them to achieve your targets.