
![]()
“Self belief and hard work always earn you success” by Virat Kohli
Before starting this article, I hope you have gone through other two parts of Tensorflow series that I have made. If not there is no problem. Please visit these blogs using the below links.
Tensorflow tutorials from basics for beginners- Part 1| AI Sangam
Optimize Parameters Tensorflow Tutorial -Part 2| AI Sangam
What we will cover in this tutorial
It is important for you to know what will be covered in this tutorial, otherwise if you are reading some thing which does not help you, it will be waste. I hope that you have run some of the code which I have attached in the previous two blogs on it. Tensorflow is one of the hot burning topic if you are passionate towards learning deep learning or is passionate to become a data scientist. We will cover the following topics in this tutorial.
- Nodes and Edges in tensorflow
- Types of control available in tensorflow with some live and understandable codes.
- Dependencies
- Conditional Statement
- Loops such as tf.while loop
1. Nodes and Edges in Tensorflow
Nodes and edges are the most important part of the tensorflow graph and if one understand this well, it will be very easy for him to analyse the tensorflow graph in the tensorboard. Don’t worry I will explain you with the help of image because understanding with the image makes the things more better. Let us build the edges and graphs using the below code
import tensorflow as tf
# keeping the x as the placeholder you can pass as many values here
x = tf.placeholder(tf.float32, shape=[3])
# it will calculate the square of the each of the value
y = tf.square(x)
#running the session to see the results
with tf.Session() as sess:
    writer = tf.summary.FileWriter('session_tensorflow',sess.graph)
    print(sess.run(y, {x: [1.0, 2.0, 3.0]}))
    writer.close()
If you run this code you will get the below output
[1. 4. 9.]
To see edges and Nodes we have to run the file events.out.tfevents.1548270051.DESKTOP-3VJHH6L formed inside the directory session_tensorflow in tensorboard. Please don’t worry, we will run it using the below command.
tensorboard --logdir=session_tensorflow
If you run this command, you will get an url like this http://DESKTOP-3VJHH6L:6006. Please open this and you will get the below image.
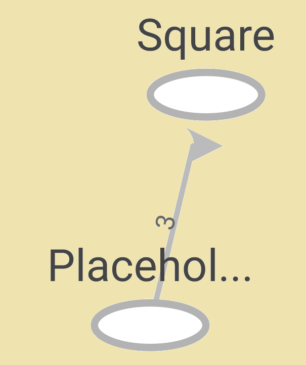
If you see diagram carefully, you can see two nodes (Placeholder and Square). Tensor (3) is the value which we can pass to the placeholder which can also be understood from code inside with tf.Session() as sess:
2. Types of control available in tensorflow with some live and understandable codes.
Dependencies: Let us understand what is dependencies using the visual image and simple understanding. Dependencies are nodes require to compute another nodes. To make it more clear please have a look at the below image
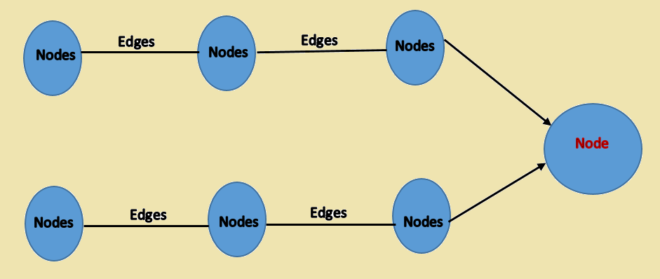
Node in red color at the end depends on the all the previous nodes. To compute this nodes all the previous nodes are required and hence for this node dependency is all previous nodes.
a.) tf.control_dependencies: Let us discuss the syntax of this and will clear the definition of it using the code because practical examples provides better understanding.
tf.control_dependencies(control_inputs)
Let us talk about control_inputs which is the argument of the tf.control_dependencies. When you place it inside loop, it is executed first before any other condition. Let us take an example. Please see the stack overflow for refined explanation of example and code.
Code is as below
import tensorflow as tf
session = tf.Session()
X = tf.constant(5)
Y = tf.constant(6)

with tf.control_dependencies([tf.assert_equal(X, Y)]):
    print('X and Y are equal!')
When you run this code, you will get the below output
Traceback (most recent call last):
File "control_dependencies.py", line 5, in
with tf.control_dependencies([tf.assert_equal(X, Y)]):
File Tensorflow-Basics\env3\lib\site-packages\tensorflow\python\ops\check_ops.py", line 389, in assert_equal _assert_static(condition_static, data)
File Tensorflow-Basics\env3\lib\site-packages\tensorflow\python\ops\check_ops.py", line 87, in _assert_static
message='\n'.join(data_static))
tensorflow.python.framework.errors_impl.InvalidArgumentError:
Condition x == y did not hold element-wise:
x (Const:0) =5
y (Const_1:0) =6
Explanation of the error:-
If you look at the with block in the code control_input/argument for tf.control_dependencies is tf.assert_equal(X, Y) which check the condition element wise and if it is wrong it will display the error. Code written below it is executed after this condition and if you place both x and y same value, you will get the result x and y are equal.
Some Suggestion:-
If you are running this code in ubuntu or windows, please install the virtual environment then run the code because your original packages will remain unaffected. Let me show you how to install virtual environment in windows for both pip2.7 and pip3.5. Please see these steps.
Code is as below for both:
#For Python 2.7
py -2.7 pip install virtualenv
py -2.7 -m virtualenv *name of environment*

#For Python 3.5

py -3.5 pip install virtualenv
py -3.5 -m virtualenv *name of environment*

#Please remember you must have installed python 2.7 and python 3.5
a.) tf.group: It creates an op that group multiple operations. There is difference between tf.control_dependencies and tf.group where former does not add new node to the computation graph while later adds new nodes to the computation graph.
a.) tf.tuple:Let us see its syntax to understand the things in better way. Information regarding syntax has been taken from Tensorflow documentation. Please refer to it from here.
tf.tuple(
    tensors,
    name=None,
    control_inputs=None
)
1.) tensors are the values
2.) control_input are the additional ops that needs to be finished before finishing this ops.
Now let us move forward towards conditional Statement such as tf.cond and tf.case. Hope you have well understood the above three one and have played with the codes which are being added. Before proceeding further, you may also look at the below article where real time face recognition have been implemented using tensorflow.
Real Time Face recognition Using FaceNet
Conditional Statement:– Let us have some healthy discussion on conditional statement. These as below
a.) tf.cond
b.) tf.case
a.) tf.cond: Let us the see the arguments for this statement. Again you can have more elaboration at the tensorflow official page. Please see the code below
tf.cond(
    pred,
    true_fn=None,
    false_fn=None,
    strict=False,
    name=None,
    fn1=None,
    fn2=None
)
pred, true_fn and false_fn are the important parameters which are to be considered.If pred is true it returns true_fn else false_fn. tf.cond is the tensorflow internal way of doing if else statement. Please remember the following command for it. Any tensor which is created outside true_fn and false_fn will be executed regardless whether it is present in the true_fn or false_fn. To make you this concept more clear let us run the example given in the tensorflow documentation.
z = tf.multiply(a, b)
result = tf.cond(x < y, lambda: tf.add(x, z), lambda: tf.square(y))
If you see it carefully if x<y then add operation is done and tensor is returned while if condition is false square of y is returned. If you can see z (another tensor which is outside the scope of true_fn and false_fn) is present in one of the branch which is true_fn. It will automatically be executed without any condition. I hope that you are following me. You can also subscribe us or follow at different social media. Below is the clickable links for our social networking accounts.
a.) tf.case: To Make you understand this, please have a look at the arguments and syntax of tf.case. Then we will see the code and understand it in a better way.
tf.case(
    pred_fn_pairs,
    default=None,
    exclusive=False,
    strict=False,
    name='case'
)
If you look carefully at the arguments it contains pred_fn_pairs which contains the boolean expression followed by python callable which will call the tensor to be returned as the output and if the condition is false then return will be the default which is assigned other tensor. You can define the callable outside this control. To have a better look please understand the below code.
f1 = lambda: tf.constant(17)
f2 = lambda: tf.constant(23)
r = case([(tf.greater(x, y), f1)], default=f2)
See fi,f2 is callable and depending on the condition desired tensor is returned. Hope you are done with this. Meanwhile if you have interest and curiosity about detecting object detection using tensorflow API you may visits below article to know some interesting points.
Tensorflow Object detection API Tutorials using Python
If you are also interested in viewing some live demo using tensorflow, please don’t miss the below video:
Loops such as tf.while:- Hopefully, i think you have found all the topics quite interesting and let us finish the things off with this one. Again before going further let us see all the arguments of this control
tf.while_loop(
    cond,
    body,
    loop_vars,
    shape_invariants=None,
    parallel_iterations=10,
    back_prop=True,
    swap_memory=False,
    name=None,
    maximum_iterations=None,
    return_same_structure=False
)
Concept is very simple. There is the condition which fits in the body until the condition is true. Loop_variables are the values which are applied to both condition and body.
In a nutshell, we have together gone through control statements used in the tensorflow starting from the dependencies then move towards condition and finally stops at looping. I hope that you will provide some feedback after reading this article and have seen some of the other blogs which I have added as well as viewed the video. AI Sangam is a data consulting and emerging machine learning company in India which believes in better future with the help of innovations and latest technology. We teach python, Django, Flask, Tornado and offers many services which you can find in the main website whose link I am placing here.
In the next part of this tutorial we will do some real coding using controls available with the tensorflow. Please stay tuned with us for playing with code.
Also Read:
Tensorflow Control Practice with Live Codes Graphs and Sessions- Part 4 | AI Sangam


After study a few of the blog posts on your website now, and I truly like your way of blogging. I bookmarked it to my bookmark website list and will be checking back soon. Pls check out my web site as well and let me know what you think.
Thanks a lot for your opinion with respect to our website. I have also gone through your website. I feel design is simple and there are redirection links. May be this is your sort of business.
With Regards
AI Sangam