![]()
What is Keras, it’s features and models??
Before going deep into layers of LSTM it is important to study and know what is Keras and its need with recurrent neural network. It is an open source library which is designed to have fast integration with deep neural networks. Considering LSTM it is designed using different activation layers such as and as well as number of hidden layers. Keras has a lot of implementation of layers and hence it is suitable to implement LSTM architecture. We can also choose Tensorflow or Theano as other option but Keras is very easy to use and one can run Tensorflow or Theano at the backend.
Why to choose Keras for implementing neural network??
- Easy to use as compared to Tensorflow or Theano.
- Layers can be add easily
Features of Keras??
- User Friendly: Keras helps in reducing cognitive load. It can be easily implemented with Tensorflow as tf.keras. From cognitive load one can understand that Keras makes the things easy and you don’t need to worry how the things will work. You can find the clear documentation of the Keras which is also simple.
- Modularity: Modules available in the Keras such as neural layers, cost function, optimiser, and activation function are standalone and hence they work independently.
- Easy extensibility: It is very easy to add new module to it and is cost effective.
Different Models implemented with Keras
- Sequential model
- Functional model
Sequential model:
Layers are in linear stack. It does not allow which allows to create model which share layers or models with multiple input and multiple output.
Functional model:
It is used for creating complex models. It allows models to share layers. One can define adhoc acyclic network graphs here.
Different layers of Keras
Dense layer:
This layer is a layer composed of neurons. It has weight matrix W, a bias b, and activation function. Dense layer is fully connected layer so all the neurons in this layer are connected to those in the next layer. Output is calculated using the following equation.
output = activation(dot(input, kernel) + bias
kernel = is the weight matrix
bias = bias vector created by this layer
Let us understand it more deep using the below code
model.add (Dense (20, input_dim = 8, activation = relu)
20 = number of neurons present in this layer
Input_dim = means the dimension of the data which is to be passed. It represents the input parameters or column numbers of the input data.
Activation = activation adds the weights coming from different neurons and decides whether it will pass or not depending on some threshold. In simple words it tells whether neuron is activated or not.
Activation Layer:
It is used to apply the activation. It decides whether the input is activated or not. As we have in the above equation, it is used to calculate the weighted sum and add bias to it. Since activation functions are non-linear in nature these makes back propagation possible. Non linearity in them enables to learn and perform complex task. These are of the following types.
Sigmoid Function ( )
It is a non-linear function which is continuous and differentiable at all points. The range of sigmoid function is from 0 to 1 and it is not symmetric at zero.
Hyperbolic tangent Function ( )
The range of lies between -1 to 1 and is centered at zero. Gradient of is greater than that of and hence it offers better learning.
RELU
Full form for RELU is rectified linear unit whose value lies between 0 to ∞. If you compare RELU with hyperbolic tangent its convergence is 6 times faster than More is the convergence, more easily algorithm gets trained.
Code for activation function is as below
keras.layers.Activation(activation)
Flatten Layer:
Flatten layer converts the stack of array into a single layer. If you pass the layer containing n rows and n columns, output from the flatten layer is m*n.
Code for flatten layer is as below
keras.layers.Flatten(data_format=None)
Dropout Layer:
This is another important layer which is used to prevent over fitting. Since the structure is so complex it helps in removing some neurons and for those neurons weight will not be updated. Please see the below code to understand it.
Keras.layers.Droupout(rate,noise_shape=None, seed=None)
If you add model.add (Droupout(0.2) it means one in 5 input will be randomly excluded from each update cycle.
RNN Layer:
It is base class for recurrent layers. It has following components.
Keras.layers.RNN(cell, return_sequences=False, return_state=False, go_backwards=False, stateful=False, unroll=False)
Cell: It is the core component of the network. A lot of discussion is done on it in the above context.
return_sequences: whether to return the last output or full output in the output sequence.
return_state: It is used to return the last state along with the output
go_backward: If this is true then process the input sequence backwards and return the reversed sequence.
stateful: if true then the last state for each sample at index i in the batch will be used as the initial state for the sample at index I in the following batch.
Unroll: If true then network will be unrolled.
Embedded layer:
This layer is used to turn the positive integer into dense vector of fixed size. Embedding means representing words and words using a dense vector representation. Embedding layer is initialised with random weights and it will learn embedding for all the words. Please look at the below code to understand it in more depth.
from keras.layers import Embedding
from keras.models import Sequential
import numpy as np
model = Sequential()
model.add(Embedding(4, 64, input_length=10))
input_array = np.random.randint(4, size=(4, 10))
print("input array is:",input_array)
print("Shape of input array",input_array.shape)
model.compile('adam', 'mse')
output_array = model.predict(input_array)
print("Shape of output array is:",output_array.shape)
Output of this code
Using TensorFlow backend.
Input array is: [[3 3 2 0 2 0 1 2 3 3]
[1 3 1 2 0 0 3 3 3 2]
[3 1 1 3 1 3 0 1 1 2]
[1 0 1 1 2 1 2 2 1 1]]
Shape of input array (4, 10)
2018-12-16 20:32:35.621090: I tensorflow/core/platform/cpu_feature_guard.cc:141] Your CPU supports instructions that this TensorFlow binary was not compiled to use: AVX2
Shape of output array is: (4, 10, 64)
Note: Please install tensorflow and keras to run this code
Tensorflow can be installed using pip install tensorflow and keras can be installed using pip install keras.
Explanation of code line wise
Line 1: Embedding is the layer so it is imported from keras.layers
Line 2: Since we are using keras sequential model hence it is imported.
Line 3: Array is used in this code and hence numpy is imported.
Line 4: object model of sequential class is created.
Line 5: Here comes the use of embedding layer. It will take three arguments. First one is the vocabulary size, second is the dense vector and third is the length of each sample. If you look carefully at the output of this code it is (4, 10, 64) whereas input has the shape (4, 10).
Line 6: We have defined the input array using randint. It is numpy array.
Line 7: Input array is print using print command.
Line 8: Shape of the input array is print using this command.
Line 9: We have compiled the model using model.compile. Adam optimizer is used and loss function is mean square error.
Line 10: In this line prediction is done using model which has been compiled.
Line 11: Shape of the output is displaced/shown.
Merge Layer:
It takes an input a list of tensors and returns a single tensor. Please see that shape of two inputs are same.
keras.layers.Add()

keras.layers.Subtract()

keras.layers.Multiply()

keras.layers.Average()

keras.layers.Multiply()

keras.layers.Concatenate(axis)
Understanding Keras LSTM Demo code
Please see the below demo code to create the demo LSTM Keras model after understanding of the above layers. This is just demo code to make you understand how LSTM network is implemented using Keras. Real code and implementation will be reflected in the next section.
model = Sequential();
model.add(LSTM(256, input_shape=(input dimension)))
model.add(Dropout(0.2))
model.add(Dense(classes, activation='softmax'))
model.compile(loss='categorical_crossentropy', optimizer='adam')
Please take care that this is not executable code and is to make you understand LSTM using keras
Explanation of these lines
Line 12: Keras sequential model is used.
Line 13: LSTM is added with 256 neurons and input dimension which will be provided when we will build sole live application using keras and LSTM. Please read the next section for understanding live application using keras and LSTM.
Line 14: Dropout layer is used and I think you have gone through the dropout layer in this section very well.
Line 15: Dense contains the same number of neurons as number of classes and result is predicted using softmax activation layer Softmax layer works on probability and converts the incoming vectors into probability distribution using the below equation.
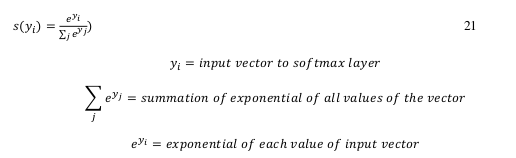
Dense will determine which class data belongs by calculating the probability of each class and majority probability class wins.
Line 16: Model is compiled using the loss function categorical_crossentropy and adam optimizer.