![]()
We all know very well that OpenCV is a very important library when we work on image/video processing/ Computer-Vision. Even in its recent updates there are many enhancement have implemented and made support of ML and DNN module efficiently for computer-vision. But beginner face many difficulties on OpenCV installation and it became a hectic process. So in this post i am trying to reduce your burden with easy and generalized installation methods on Linux having Ubuntu OS.
There are mainly three ways of OpenCV installation in Linux environment. we are going to describe each of the ways so that you can boost up your speed of development. Without wasting of time we directly come to the main point.
Main 3 ways of OpenCV installation are as:
- Using Linux common installation via apt-get
- Using python package installer(pip)
- Using make compilation from source.
All method have its own pros and cons but mainly it depend upon your terms of use, Although i want to suggest you that installation form source is the best method which is applicable in all development processes. We will discuss each one by one.
1. Using Linux common OpenCV installation technique via apt-get:
This method is very easy to make OpenCV installation working, generally it is useful when you have to install Caffe library. In this method only you need to run below given command in your Linux terminal for Ubuntu OS.
$ sudo apt-get install python-opencv
If there is any error then resolve them and re-run this command. If you got any error then you can post here to get help. Or you can search error on open-source platform like Google or stack-overflow
After this you can check its version from python terminal
import cv2 as cv
print(cv.__version__)
2. using python package installer(pip):
You can use pip(package installer for Python) for OpenCV installation. This is really fast ways to use OpenCV in your python code. For this you need to run these command:
$ pip install opencv-python
or
$ pip install opencv-contrib-python
After successfully OpenCV installation you can check its version from python terminal
import cv2 as cv
print(cv.__version__)
But using this way you will get much difficulties to execute code in which c++ code integration takes place. So among all ways, using make installation of really is the best ways. In next point we are going to cover this steps.
3. Using make compilation from source.
In this way we will only focus on most generalized method without any complexity. This set of command works mostly on all Linux PC having Ubuntu OS.
Prerequisite versions of application should be install in your pc:
- GCC 4.4.x or later
- CMake 2.8.7 or higher
- Git
- GTK+2.x or higher, including headers (libgtk2.0-dev)
- pkg-config
- Python 2.6 or later and Numpy 1.5 or later with developer packages (python-dev, python-numpy)
- ffmpeg or libav development packages: libavcodec-dev, libavformat-dev, libswscale-dev
If these libraries are missing from your pc then we will firstly install using below commands
Now open your system terminal and just use these command line to install OpenCV:
Step 1
Install all pre-requisites packages :
Using this step you will make your system ready for OpenCV installation. All the required OpenCV-dependant package will be install via these command
$ sudo apt-get install build-essential
$ sudo apt-get install cmake git libgtk2.0-dev pkg-config libavcodec-dev libavformat-dev libswscale-dev
Optional (Recommended to execute):
$ sudo apt-get install python-dev python-numpy libtbb2 libtbb-dev libjpeg-dev libpng-dev libtiff-dev libjasper-dev libdc1394-22-dev
Step 2
Download OpenCV source repository:
Download OpenCV source files from Git-Hub. Either you can download it manually from Git-Hub.
https://github.com/opencv/opencv
https://github.com/opencv/opencv_contrib
OpenCV-Contrib part is optional for extra module support in OpenCV(recommended)
else, via terminal you can download this source file from below given comand line.
$ cd ~/<working_directory>
$ git clone https://github.com/opencv/opencv.git
$ git clone https://github.com/opencv/opencv_contrib.git
Step 3
Building OpenCV from Source Using CMake and make:
Now we need to make directory to generate build, make and all its binaries files. For this use below commands
$ cd ~/<working_directory>/opencv
$ mkdir build
$ cd build
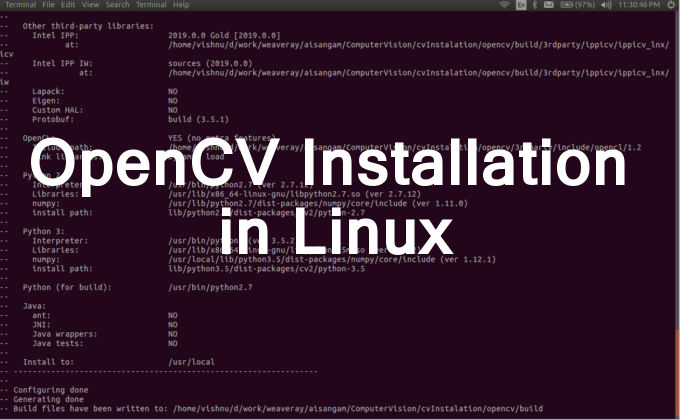
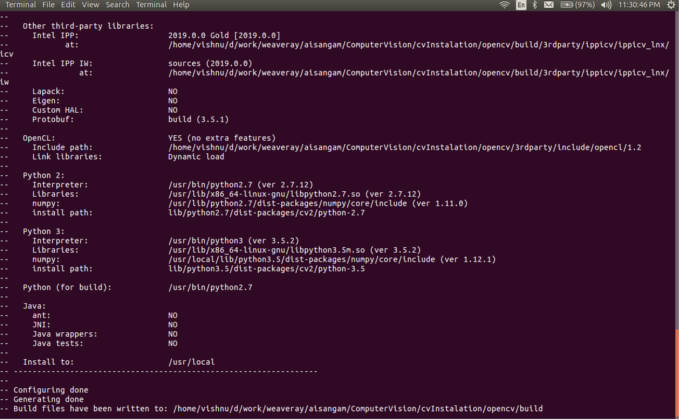
Now run CMake command for its config generation.
$ cmake -D CMAKE_BUILD_TYPE=Release -D CMAKE_INSTALL_PREFIX=/usr/local..
If you want to use opencv-contrib also then use this command:
$ cmake -D CMAKE_BUILD_TYPE=Release -D CMAKE_INSTALL_PREFIX=/usr/local -D OPENCV_EXTRA_MODULES_PATH=../../opencv_contrib/modules/ -D OPENCV_GENERATE_PKGCONFIG=ON ..
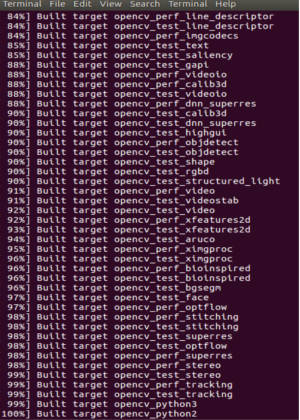
Now we have to make build source file from build-directory.
You will get Information of build like this:
$ make -j7 # runs 7 jobs in parallel(for 7-core processor)
If you have 4-core processor then run below command. According to the number of processor exist in your CPU you can change this number.
$ make -j4  # runs 4 jobs in parallel
After run this command you will get info on terminal like this.
step 4
Final step of OpenCV Installation:
After this run below command to make final installation in root system:
$ sudo make install
$ sudo sh -c 'echo "/usr/local/lib" >> /etc/ld.so.conf.d/opencv.conf'
$ sudo ldconfig
That’s it. Now you can check version of OpenCV from python terminal
Additional points:
If you want to run OpenCV via virtual-environment then you have to perform this step:
For python3.5 virtual-environment:
$ cd <Virtual-Environment path>/lib/python3.6/site-packages/
$ ln -s /usr/local/lib/python3.5/dist-packages/cv2/python-3.5/cv2.cpython-35m-x86_64-linux-gnu.so cv2.so
For python2.7 virtual-environment:
$ cd <VirtualEnvironment path>/lib/python2.7/site-packages/
$ ln -s /usr/local/lib/python2.7/dist-packages/cv2.so cv2.so
You can check version of OpenCV within virtual-environment python console.
Hope this will work and you have enjoyed this post. If there is any difficulties then let us know via comment or error posting here. You can get more computer-vision posts from here.